Data Center VXLAN EVPN Fabric Underlay Model
Choose the Data Center VXLAN EVPN fabric type when you deploy a VXLAN EVPN fabric with Cisco Nexus 9000 and 3000 switches. The fabric type uses a default architecture that you configure during the Web Installer initialization. Most network parameters are provisioned by default. The only values that you must manually enter are the BGP autonomous system (AS) number and the site number for each VXLAN domain. The other fields can use the default settings.
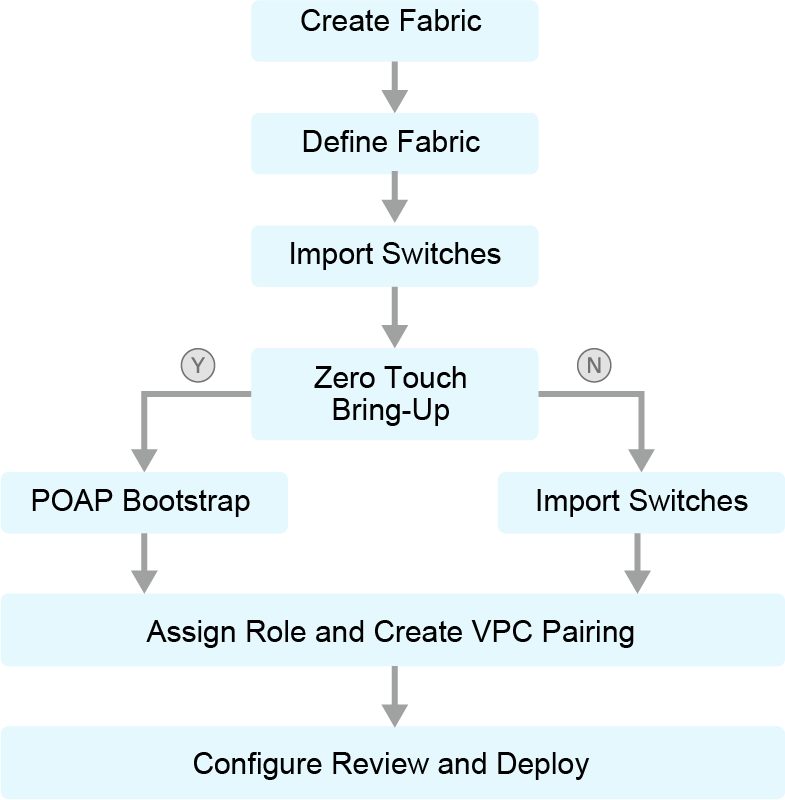
Optionally, you can enable Tenant Routed Multicast (TRM) to optimize the routed multicast traffic across the VXLAN EVPN fabric. Cisco NDFC automates the deployment of multiple fabric devices by using the PowerOn Auto Provisioning (POAP) bootstrap that is configured from the centralized Cisco NDFC platform. As a result, it is not necessary to connect switch by switch and use each physical console port to configure the manageability access via the CLI language. Cisco NDFC automatically discovers the switches that you have identified as part of the VXLAN fabric and automatically downloads their configuration during their power cycle.
The Data Center VXLAN EVPN fabric provisioning feature supports existing and new VXLAN EVPN fabrics.
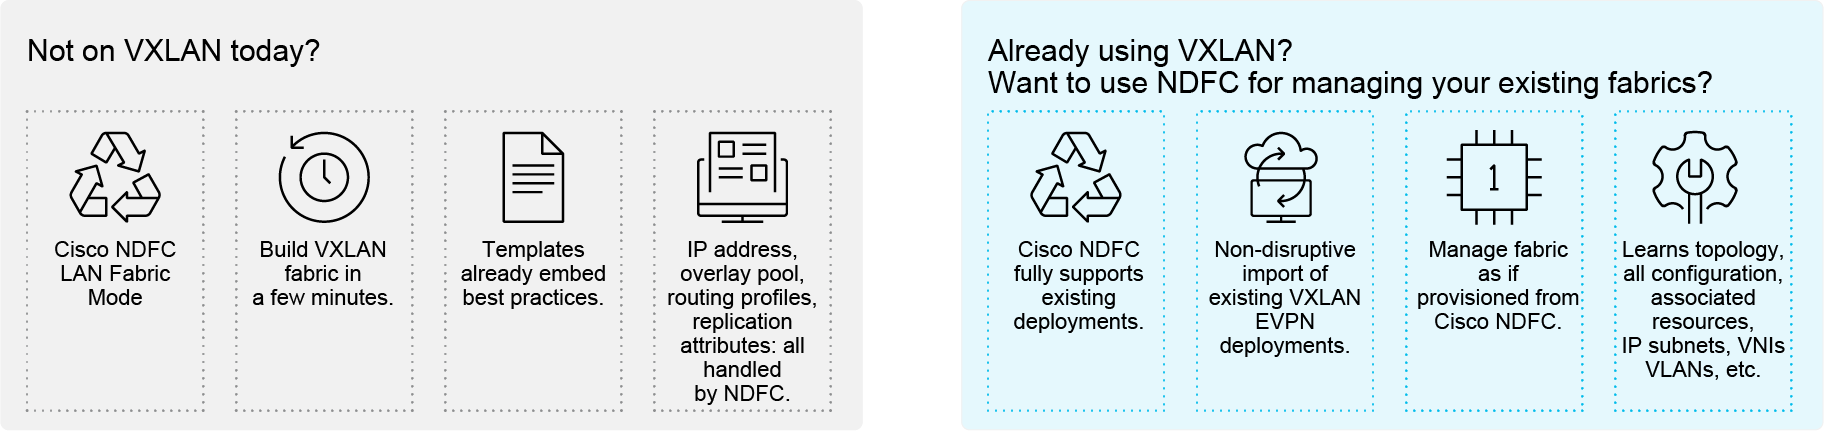
Fabric Provisioning with Data Center VXLAN EVPN Fabric
Cisco NDFC supports the brownfield import of fabrics with VXLAN overlay provisioned with configuration profiles. The import process uses the configuration profiles to re-create the overlay configuration intent. Underlay migration takes place with the usual brownfield migration.
You can use this feature to recover your existing Data Center VXLAN EVPN fabric when no Cisco NDFC backup is available to restore. In this case, you must install the latest Cisco NDFC release, create a fabric, and then import the switches into the fabric.
Also, you can use the feature for greenfield deployments or when you provision new VXLAN EVPN fabrics. Or use it for brownfield deployments for VXLAN EVPN fabrics that you already have. The Data Center VXLAN EVPN fabric template supports Cisco Nexus Fabric Manager (Cisco NFM) migration to Cisco NDFC. Additionally, you can migrate CLI-configured VXLAN EVPN fabrics to Cisco NDFC.
LAN Fabric (VXLAN EVPN) Greenfield Deployment
Cisco NDFC deploys a VXLAN fabric with an OSPF- or IS-IS–based underlay.
This technology was designed for a fabric with BGP-routed fabric or BGP VXLAN EVPN fabric. You can create a top-down network configuration for a routed fabric with Cisco NDFC. A routed fabric runs on one VRF, which serves as the default VRF.
Greenfield deployments feature day-0 bring-up with the autobootstrap function. You can use flexible Python templates to generate configuration. The underlay itself includes fabric definition and creation, device discovery, and configuration generation, previewing, and deployment. The deployment supports any combination of replication, multicast, interior gateway protocol (IGP), IP, numbered, and unnumbered options. Pair virtual port channels (vPCs) with a single click.
LAN Fabric (VXLAN EVPN) Brownfield Deployment
Data Center VXLAN EVPN fabric provides you with a nondisruptive way to migrate a CLI fabric to Cisco NDFC.
Cisco NDFC supports the brownfield import of fabrics with a VXLAN overlay that provisions with configuration profiles. This import process re-creates the overlay configuration intent, based on the configuration profiles. The underlay migration performs with the usual brownfield migration.
This feature can recover your existing Data Center VXLAN EVPN fabric when a Cisco NDFC backup is unavailable for restoration. In this case, you must install the latest Cisco NDFC release, create a fabric, and then import the switches into the fabric.
The following guidelines relate to supporting configuration profiles:
The Data Center VXLAN EVPN fabric template supports the brownfield migration of configuration profiles.
The configuration profiles on the switches must be a subset of the default overlay Universal profiles. Extra configuration lines that are not part of the Universal profiles will cause unwanted profile refreshes. In this case, after you click Recalculate and Deploy, review the differences with the Side-by-side Comparison feature and deploy the changes.
Brownfield migration with switches that have a combination of VXLAN overlay configuration profiles and regular CLIs is not supported. If it detects this condition, an error generates and the migration terminates. All the overlays must have either configuration profiles or regular CLIs.
Brownfield Deployments
The Data Center VXLAN EVPN fabric template supports Cisco NFM migration to Cisco NDFC. Migrate the CLI-configured VXLAN EVPN fabrics to Cisco NDFC.
Configuration Compliance makes it easy for you to deploy and roll back fabric configuration. You can use Fabric Builder to deploy VXLAN EVPN without learning the intricacies of a complex feature or logging into an outside site. Fabric Builder uses autobootstrap POAP, discovers the switches, and deploys the underlay.
Follow these steps to use the Data Center VXLAN EVPN fabric in a brownfield deployment.
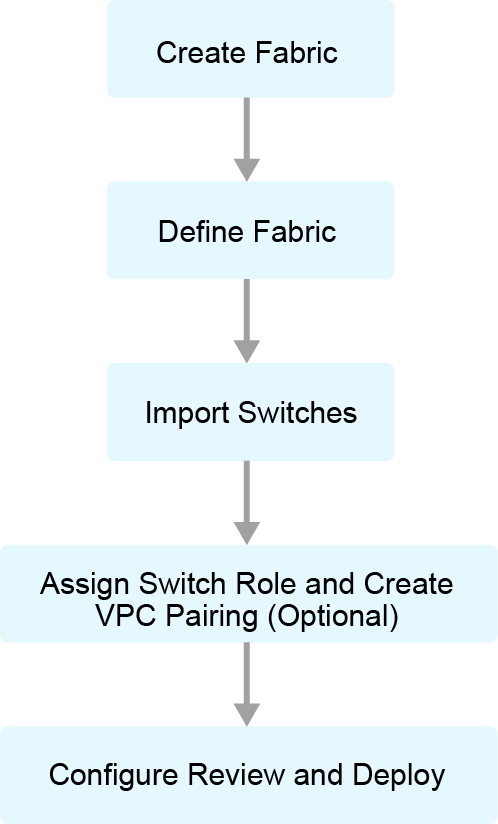
The Cisco NDFC brownfield deployment requires the following procedure:
Verify the existing VXLAN EVPN fabric.
Create a VXLAN EVPN fabric.
Add switches and transition the VXLAN fabric management to Cisco NDFC.
Verify the import of the VXLAN EVPN fabric.
Fabric Builder
The Fabric Builder turnkey function comes with Cisco NDFC and facilitates day-0 provisioning of your data center networks.
Fabric Builder lets you quickly build a VXLAN EVPN fabric with minimal input. The templates that it provides contain all the functions that you need to define the underlay, the VTEPs, and the overlay control plane. It incorporates best practices to ensure that you build the fabric in the most efficient way. You can customize Fabric Builder templates or create new templates. The flexible Python+ infrastructure within Cisco NDFC accommodates any configuration across any subset of devices. You can create freeform configurations at the interface, device, and fabric levels. Fabric Builder handles day-0 through day-2 provisioning for all Cisco Nexus platforms, whether they are LAN fabrics (VXLAN EVPN–based fabrics) or classic LAN deployments.
When you log in for the first time, the Fabrics section has no entries. Begin by navigating to the Actions > Create Fabric window.
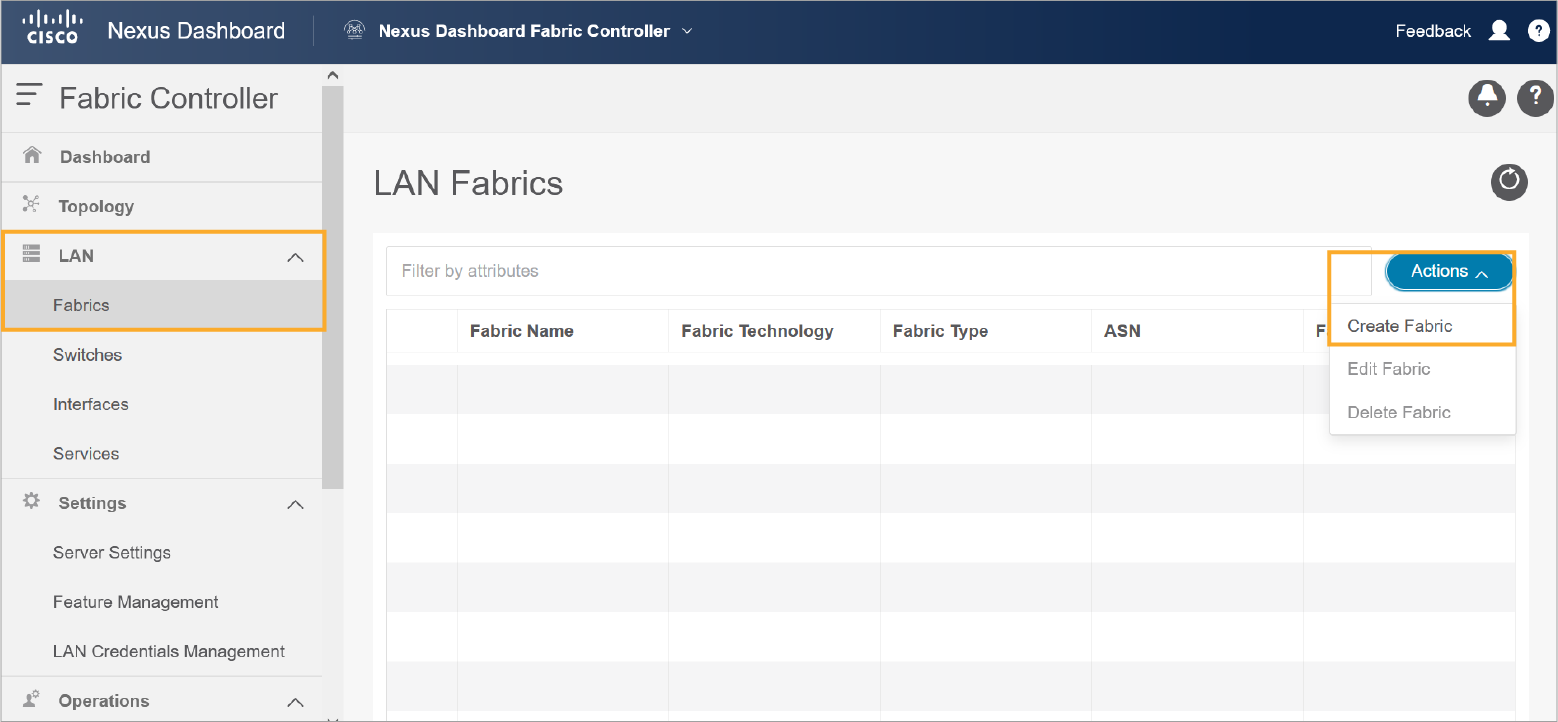
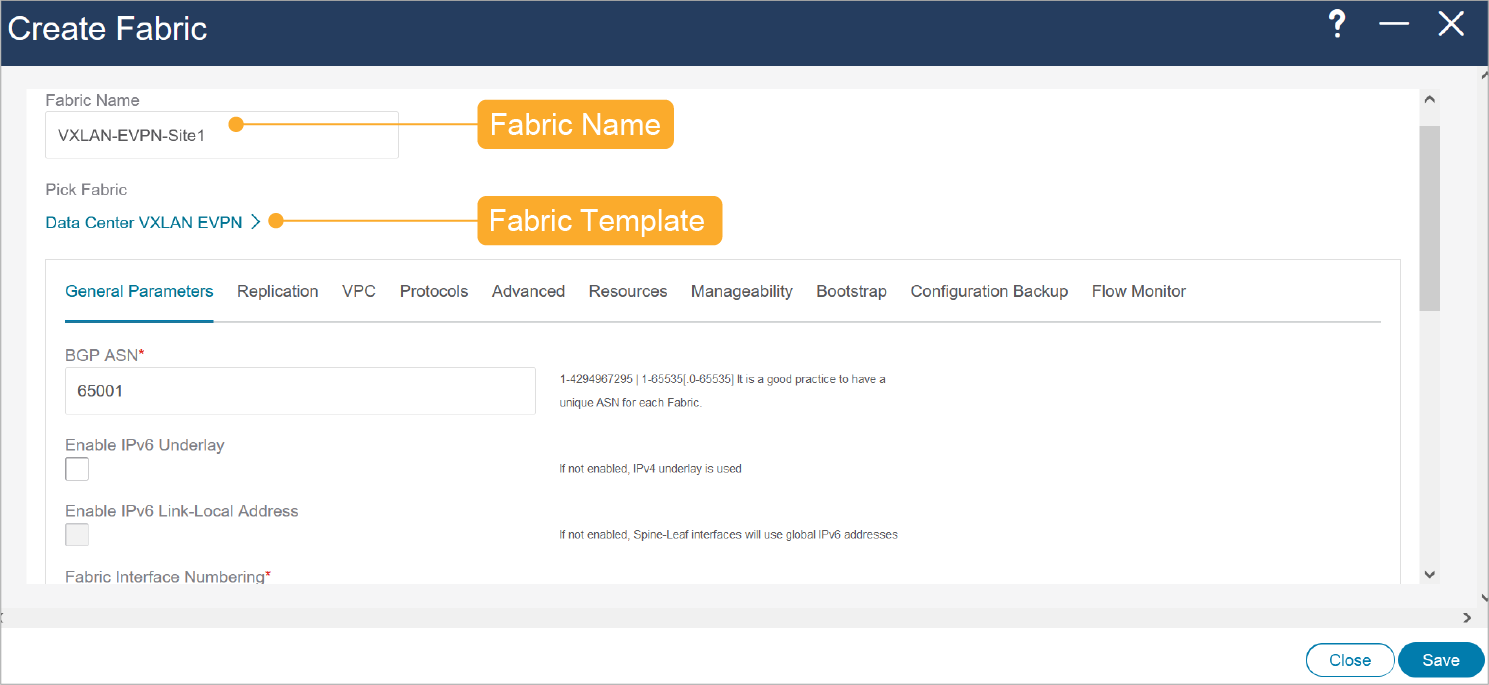
To begin the Data Center VXLAN EVPN fabric provisioning, choose the Data Center VXLAN EVPN fabric template from the Fabric Builder Wizard. In the Create Fabric window enter the fabric name and choose the Data Center VXLAN EVPN fabric template. The fabric settings that you need to create a standalone fabric will appear.
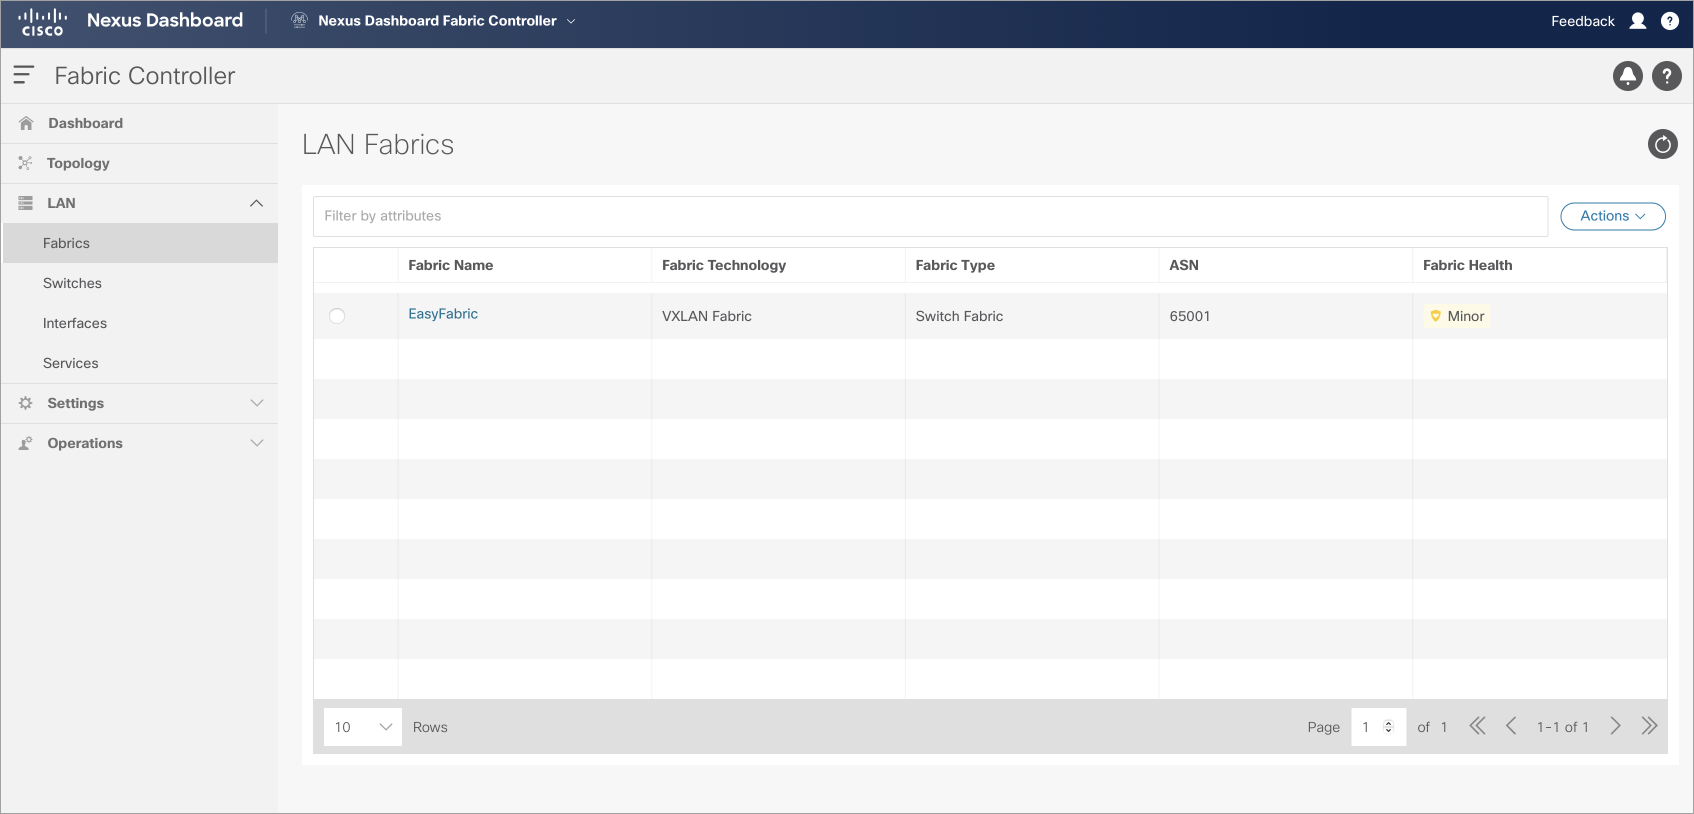
Fabrics that you create will display on the LAN > Fabrics window. Standalone or member fabrics contain VXLAN Fabric in the Fabric Technology field, Switch Fabric in the Fabric Type field, the AS number in the ASN field, and the fabric health in the Fabric Health field.
Greenfield Deployment with POAP
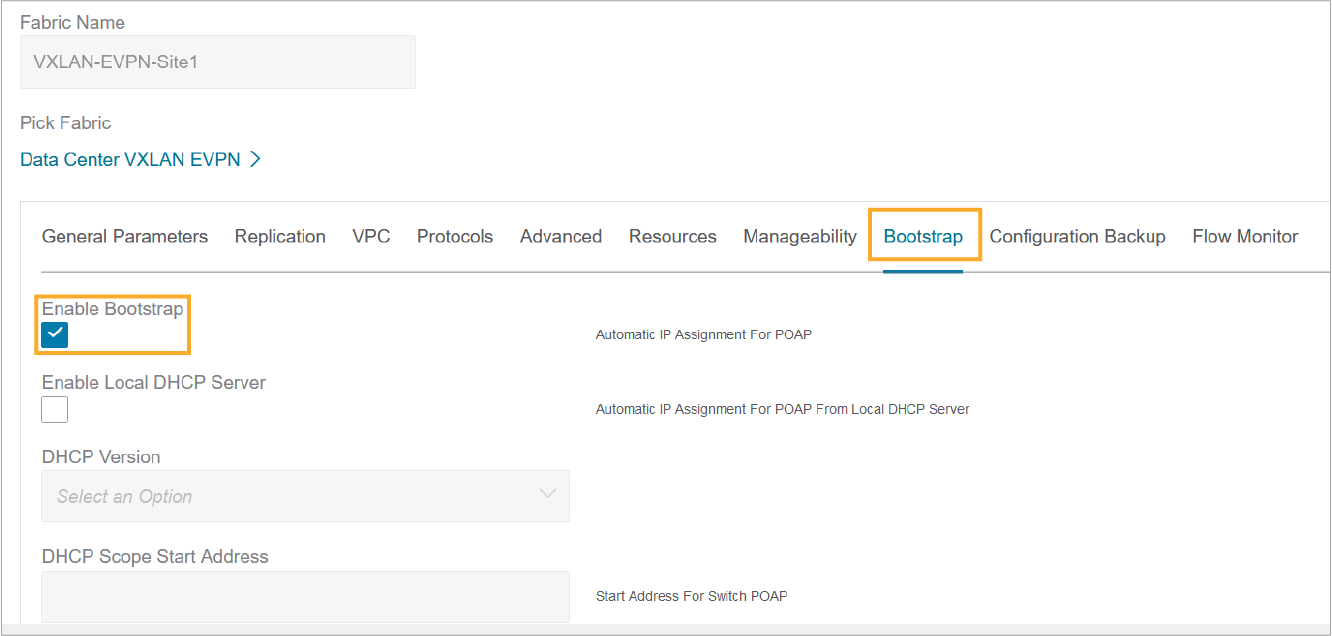
Use POAP to add new switches to the fabric. To do so, check the Enable Bootstrap check box in the Bootstrap tab when adding a new or editing an existing data center VXLAN EVPN fabric.
When a new Cisco Nexus Operating System (Cisco NX-OS) device is powered on, typically that device has no startup configuration or any configuration state for that matter. So, it powers on with Cisco NX-OS and, post-initialization, goes into a POAP loop. The device starts sending out DHCP requests on all the interfaces that are up, including the mgmt0 interface. If there is IP reachability between the device and Cisco NDFC, the DHCP request from the device will be forwarded to Cisco NDFC. For easy day-0 device bring-up, the bootstrap options should be enabled in the Fabric Settings.
Cisco NDFC then retrieves the serial number, model number, and version information from the switch and displays the information that it retrieves. You can add a switch by providing the IP address, hostname, and password.
Brownfield Deployment Manual Bootstrap
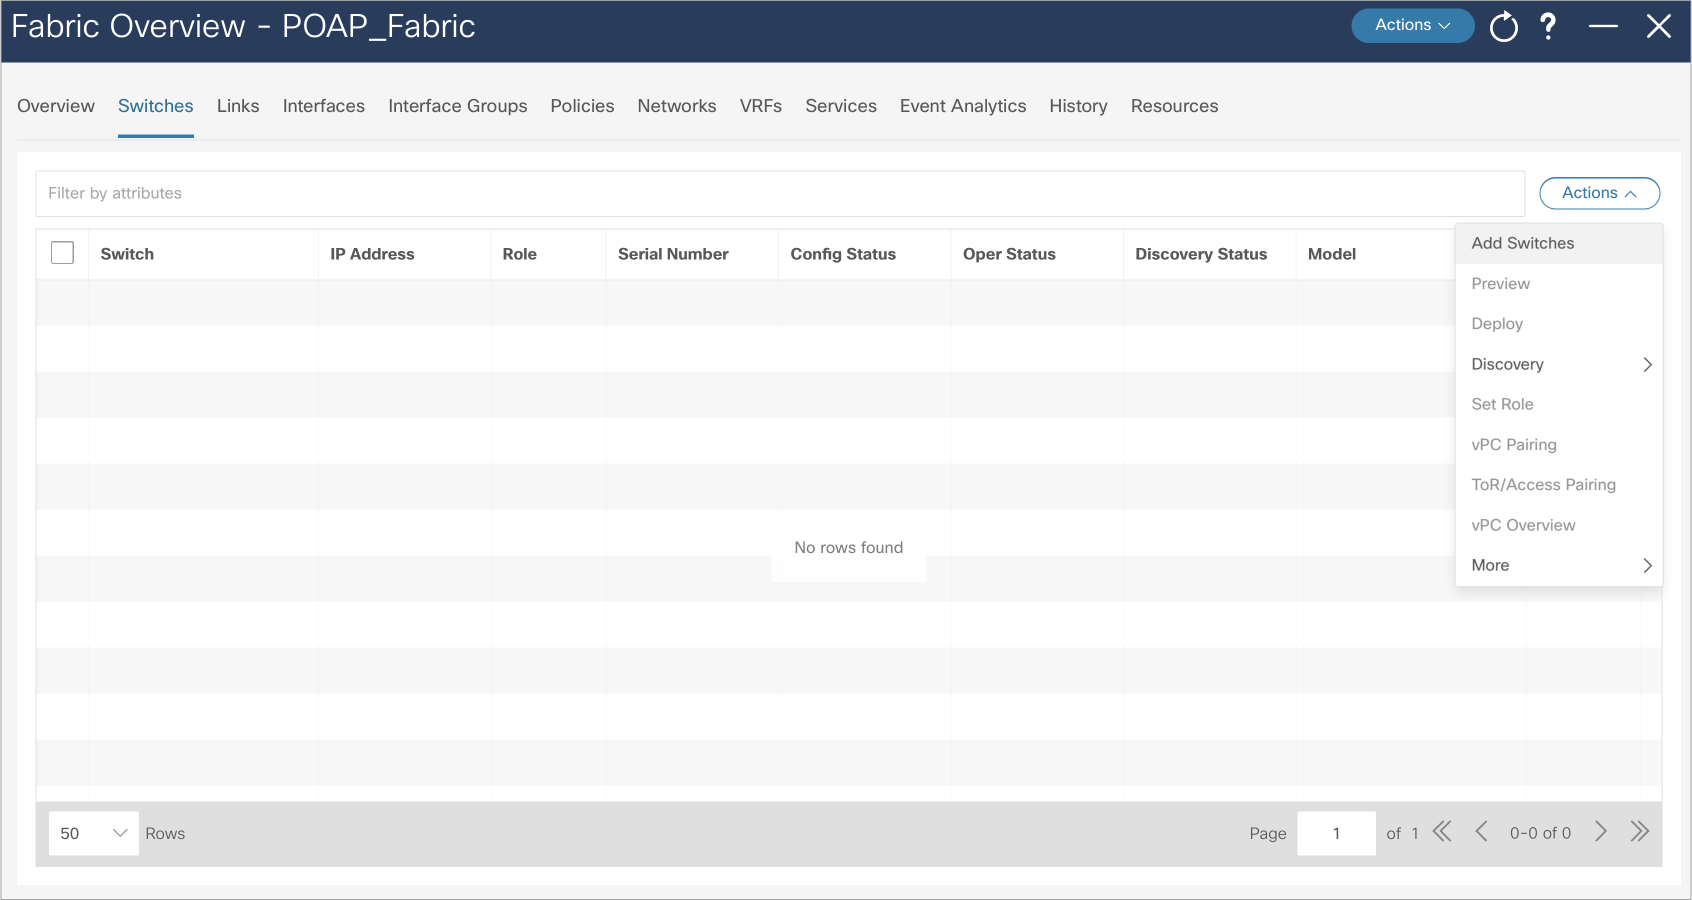
After you click Add Switches in your fabric, you can use the Discover option to add an existing switch with known credentials to the standalone fabric.
Provide information for the IP address (Seed IP) and the administrator username and password (Username and Password fields) of the switch.
For this brownfield deployment, be sure to check Preserve Config to maintain the existing switch configurations.
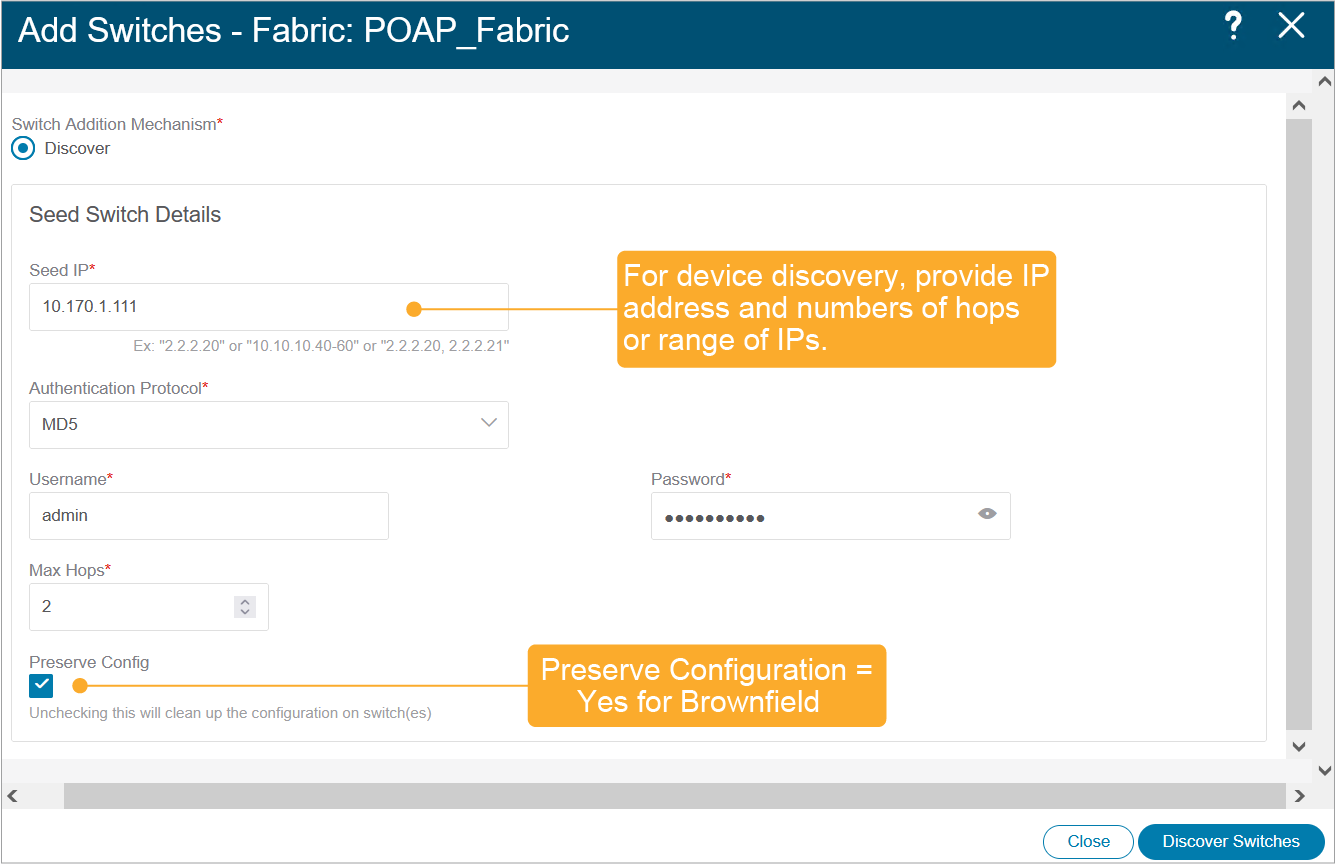
Click Discover switches. The Add Switches window appears. Since the Max Hops field was populated with 2, the switch with the specified IP address and the switches that are two hops from it display in the Discovery Results.
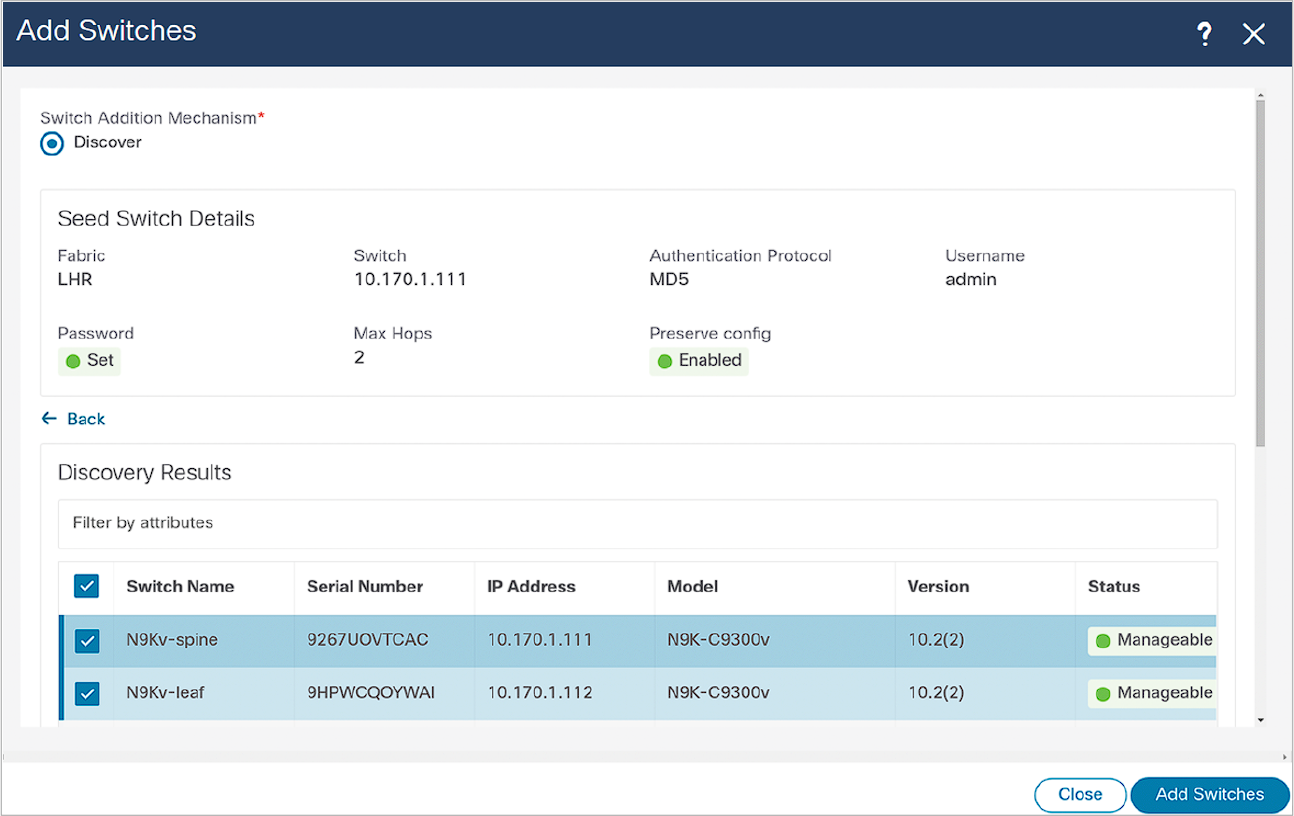
It is a best practice to discover multiple switches at once. Ensure that switches are properly cabled, connected to the Cisco NDFC server, and exhibit a Manageable switch status.
Check the check boxes next to the switches and click Add Switches.
The switch discovery process initiates. The Progress column displays progress for all the switches that you choose. It displays Switch Added for each switch after the server discovers it.